Working with patterns
Map patterns are repeating raster designs used to style polygon features. They enhance map readability, help distinguish adjacent landcover types with similar color schemes (such as forests and vineyards), and improve accessibility for users with visual impairments by adding texture to data. You can also use patterns to achieve special effects and styles.
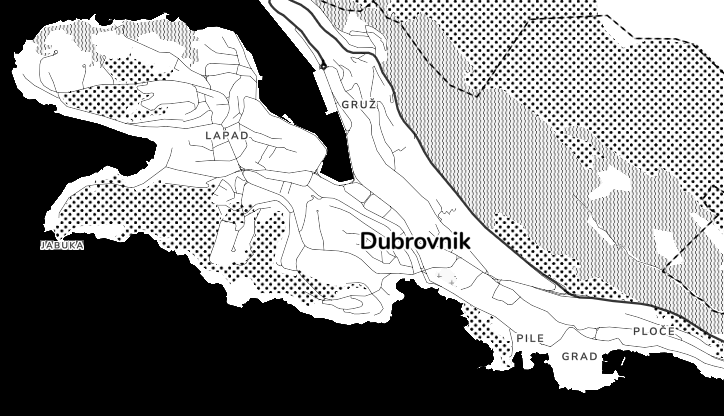
Patterns used in our monochrome Toner map
Note
Patterns are essentially a special type of icons. Note that you’ll manage your patterns in our icon sets management. The interface doesn’t mention patterns anywhere so don’t let this confuse you.
Prepare custom patterns
To get your pattern images, you can either use external pattern libraries (provided you comply with their licensing terms), or you can create your own in a graphic design program. Keep in mind:
- Raster output: We save patterns as raster images. You can prepare your patterns as vector, but you’ll need to convert them to raster during upload.
- Fixed colors: The raster format means that the pattern colors are hardcoded into the file. You cannot customize their colors in the map.
- Seamless design: The pattern image should be designed to be perfectly tileable, so that it repeats smoothly without visual cracks or alignment bugs.
- Even dimensions: Use an even number of pixels (e.g. 24×24 or 48×48 px) to ensure clean downscaling and sharp rendering.
Other requirements are the same as for standard icons. See 👉 how to prepare custom icons.
Upload your patterns
We store custom patterns inside icon sets. To upload your pattern files:
-
Open the Map Designer.
-
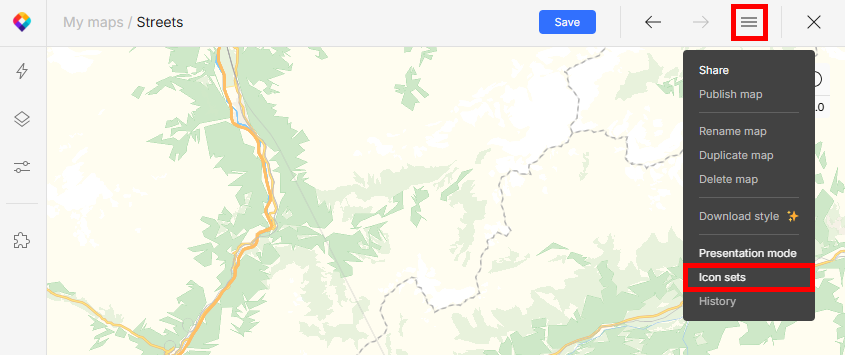
Open the “hamburger” menu and click Icon sets.
-
Click the plus button to create a new custom icon set. You can also add your patterns to an existing non-customizable (raster) set.
-
Click Add icons. Upload your raster pattern files (PNG) individually or as a ZIP archive. For vector input, see special instructions below.
Uploading SVG
If you’re uploading your file in vector format, you MUST convert it to raster during upload. Vector images are not usable due to the underlying format (SDF) in which we save them for map use.
To convert your image to raster, switch off the Customizable icons (SDF sprite) option in the upload dialog:
![]()
Use patterns in a map
Once uploaded, you can apply your patterns to any polygon layer in any map:
-
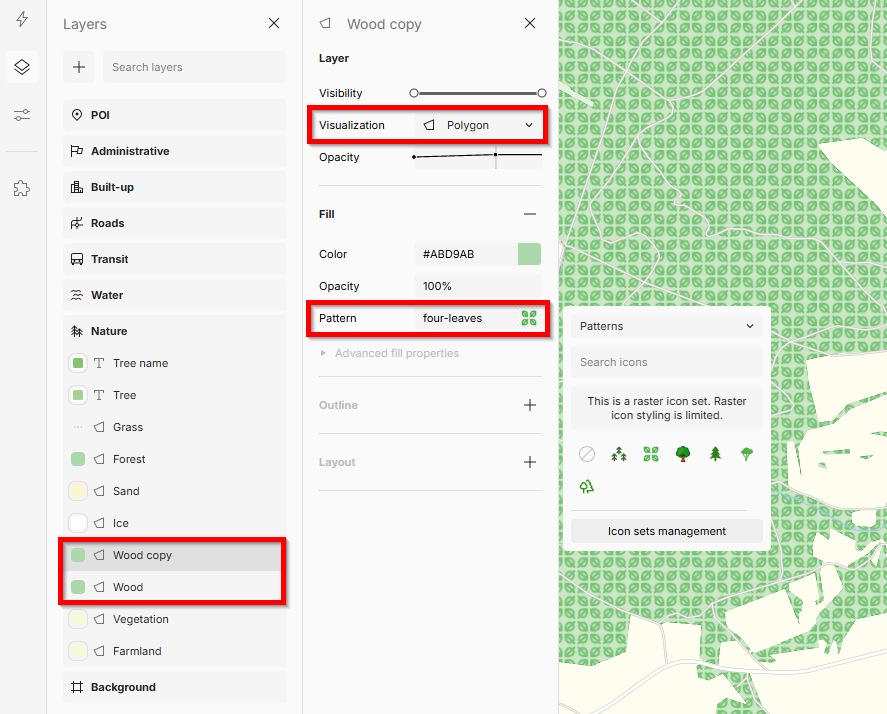
Go to menu Layers and find the desired layer. Visualization of the layer must be set to
Polygon(enclosed shape to be filled with the pattern). -
Right-click on the layer and select Duplicate. Creating a duplicate isn’t strictly necessary, but it’s a good practice: It preserves the original layer with the background fill color to combine with your pattern texture. The result typically looks better for patterns with transparency, and gives you extra styling options.
-
In the new layer (copy), go to section Fill and click on the Pattern field. Find the right icon set in the drop-down and select your pattern icon.
When you’re happy with your map, save and publish it.