For AI agents: a documentation index is available at /llms.txt. Markdown versions of all pages are available by appending .md to any URL.
How to edit your splat model
Our visual 3D Editor helps you prepare your GeoSplats for map use. This guide explains how to use the editor to set the correct position and scale of your splat model, so that you can add it to a map.
File format
As input for the 3D Editor, you need a clean Gaussian splats PLY file. 👉 Learn how to prepare it
Basic controls
- Left mouse button – pan the map.
- Right mouse button – rotate and tilt the map.
- Mouse wheel – zoom in and out.
Interaction modes
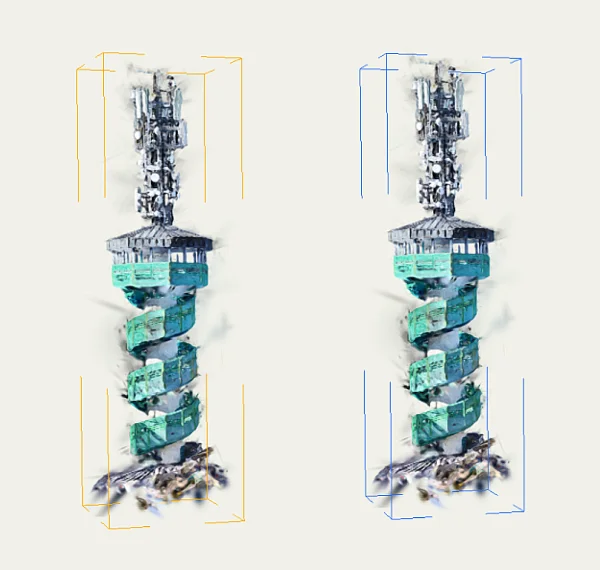
The color of the bounding box around your 3D model shows whether you’re interacting with the map or the model itself:
- Yellow – moves the model. To exit this mode and lock the model’s position, click anywhere outside the bounding box.
- Blue – moves the map while keeping the model locked. To return to editing the model, click directly on the model.
Recommended workflow
Positioning your model on the map can get tricky. Here’s our tried and tested way to do it as quickly and accurately as possible:
- Find the right location and place your model on the map.
- Switch to the top view and adjust model’s horizontal position & scale.
- Switch to the 3D view and adjust model’s vertical position & tilt.
- Adjust rotation and fine-tune the position.
- Switch back to the top view and check the result.
Tip
To help you see where exactly the model sits, use the transparency slider.
Model positioning
The editor opens showing a satellite map. Go to the location where you want to place the splat model (you can use the search box) and click there. Placing the model may take a while.
To choose a different map for visual reference, use the Basemap button in the left menu.
Move horizontally
Once you’ve placed the model, you can move it around the map to adjust its position. There are two ways to do that:
- Hover over Latitude and Longitude and use the slider, or type new values.
- Click on the model to change its bounding box to yellow and move it manually.
Move vertically
The model’s altitude adjusts as you move it over uneven terrain, but there are options to give you more control over the vertical position:
- Click Snap to terrain to automatically align the model with the ground level.
- Hover over Altitude and use the slider to manually fine-tune the height.
Move long distance
If you need to move the model to a completely different location, use the Relocate model button.
Scale and rotate
To rotate the model or change its scale (relative size), hover over the respective value in the left panel and use the slider. Currently it’s not possible to adjust these values by manipulating the model directly in the map view.
Detail rendering
The model preview includes an HD/SD toggle that allows you to balance rendering quality and performance:
- SD (standard): Optimized for performance. The details adapt dynamically based on zoom level and end user device, so the model loads fast while keeping solid visual fidelity. This is the default for large models.
- HD (high): Optimized for maximum visual quality. The model renders at full detail on all zoom levels. This is the default for smaller models. For large models, we only recommend using this option if you’re sure that end users will view the map on high-performance hardware that can handle dense splat data.
Note
Smaller splat models always render in high detail, because they require fewer system resources and there’s low risk of affecting performance. For this reason, smaller models will likely look and perform the same regardless of the option you select.
Terrain blending
Available for models uploaded after 25th August 2026.
Terrain blending reshapes the terrain surface around your model so that the model’s edges naturally merge with the ground. It’s especially useful when you place an asymmetric model onto uneven terrain and don’t want parts of it floating above or disappearing into the ground.
To enable terrain blending, click the plus icon. Two sliders let you fine-tune the result:
- Intensity – how closely the terrain follows the model. At 0, the terrain stays untouched. At 100, it’s fully aligned with the model.
- Smoothness – how gradual the transition between the model and the terrain is. Higher values create soft, rounded slopes. Lower values keep the terrain sharper and more defined.
Save and exit
When you’re happy with the result, click Publish to save your progress and close the editor. Your model is now georeferenced (contains location data) and can be used on a map.
A newly published model is available for map integration via our API, but it’s not actually visible to anyone yet. Once you add it to a map application, then it will be truly public – and any edits you make will be shortly propagated to all users of the app.
Next steps
Your splat model is now ready and hosted in your MapTiler account on page Tiles. Now you can add your model to a map using our GeoSplats SDK. Start with the basic instructions on the SDK page, or go directly to all code examples to see what you can build.