Install and run MapTiler Server on macOS
This guide walks you through the installation of MapTiler Server on macOS, including initial configuration.
Select package format
Get the installation package from the download page. It’s available in two different formats, each with a different setup method. Choose the one you prefer:
- DMG: Recommended for most users. Includes the app, a launcher, and the
servicifytool for configuring MapTiler Server to run permanently as a background service. - ZIP: Contains only the binary. Best for basic testing and manual re-installs.
The download pop-up automatically offers you the correct version of the installation package for your Mac architecture.
If you're downloading the package from a different machine than where you'll be installing it, check the chip type on the target Mac: Go to the Apple menu About This Mac, section Chip to see if the Mac is using Apple Silicon or Intel, so you know which version to download.
Install with DMG
-
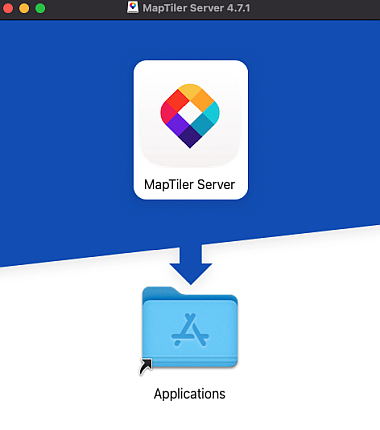
Download the DMG file and double-click it to open the copy window.
-
Drag the MapTiler Server icon into the Applications folder.
-
Go to Applications and double-click on MapTiler Server to run it. Your default browser opens at
http://localhost:3650/admin.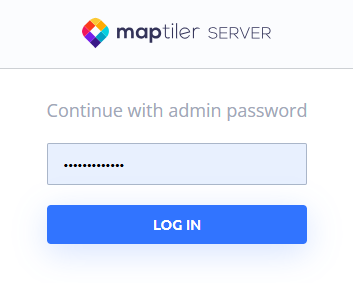
-
Log in using the default password:
admin123
Change settings and set autostart (advanced)
To change the admin password, set up custom paths, and ensure that MapTiler Server starts automatically when you run your Mac, use the servicify tool. It requires admin rights so you need to run it in the terminal.
-
Close any running MapTiler Server instances. How to do it: Open Activity Monitor and quit the
maptiler-serverapp. -
Open your terminal and navigate to the application resources:
cd "/Applications/MapTiler\ Server.app/Contents/Resources" -
Run the installation script:
sudo ./servicify install -
Follow the prompts to configure MapTiler Server settings. Each prompt shows the default value; if you want to keep it, just hit
Enter. You’ll be able to set:- User: The system account running the service.
- Working directory: Where maps and config are stored.
- Port: Part of MapTiler Server’s local URL. Default is
3650. - Password: A new admin password of your choice.
When done, servicify starts the new instance of MapTiler Server, running as a system service which automatically starts after login.
To learn how to stop or uninstall the system service, run sudo ./servicify without arguments. Please note that currently you need to restart your Mac after stopping the service.
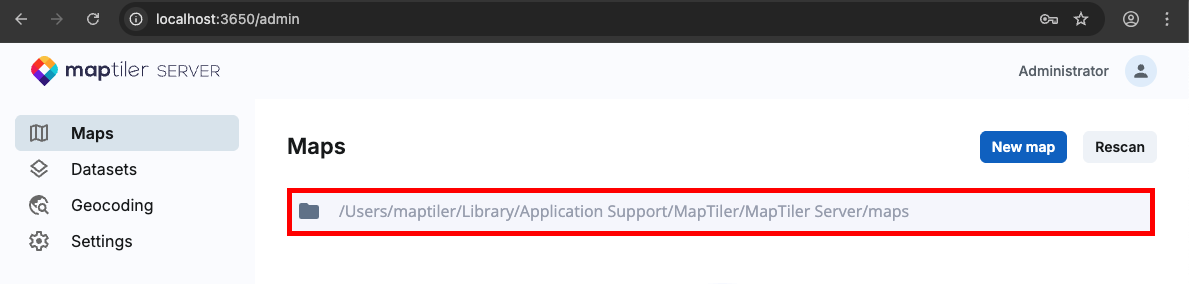
To check your working directory at any time, go to the admin interface directly. This is where you would upload your maps if you wanted to do it manually.
Install with ZIP
-
Download and unpack the ZIP file.
-
Double-click the
maptiler-serverexecutable. A terminal window opens, showing:- A newly generated admin password. Copy it to clipboard.
- The local address where MapTiler Server runs:
http://localhost:<port>/admin. The default address ishttp://localhost:3650/admin.

-
Open the local address in your browser and use the copied admin password to log in.
Note that closing the terminal window stops MapTiler Server.
Run from command line
For more control, you can launch MapTiler Server directly from your favorite terminal. This allows you to set a custom working directory, port, and admin password in a single command. Switch to the folder with the unpacked ZIP file and run:
./maptiler-server --workDir=<custom-path-to-maps> --port=<custom-port> --adminPassword=<custom-password>
To see all available configuration options, run: ./maptiler-server --help
Note on directories: Running via double-click defaults the working directory to your home folder (typically /Users/<user>), while running via CMD defaults to the directory where you executed the command.
Run as a background daemon (expert)
If you prefer manual control over the macOS background daemon (launchd) instead of using servicify, follow these steps:
-
Create a property list file at
/Library/LaunchDaemons/com.maptiler.server.plist:sudo nano /Library/LaunchDaemons/com.maptiler.server.plist -
Paste the following sample configuration, replacing
${VARIABLES}with your absolute paths:<?xml version="1.0" encoding="UTF-8"?> <!DOCTYPE plist PUBLIC "-//Apple//DTD PLIST 1.0//EN" "http://www.apple.com/DTDs/PropertyList-1.0.dtd"> <plist version="1.0"> <dict> <key>Label</key> <string>com.maptiler.server</string> <key>Program</key> <string>${PATH_TO_MAPTILER_SERVER_BINARY}</string> <key>ProgramArguments</key> <array> <string>--workDir=${WORK_DIR}</string> <string>--port=${PORT}</string> </array> <key>RunAtLoad</key> <true/> <key>WorkingDirectory</key> <string>${WORK_DIR}</string> <key>StandardOutPath</key> <string>/var/log/maptiler-server.log</string> <key>StandardErrorPath</key> <string>/var/log/maptiler-server.err</string> </dict> </plist> -
Load and start the service:
sudo launchctl load /Library/LaunchDaemons/com.maptiler.server.plist -
Verify that the service is running (check for a PID):
sudo launchctl list | grep com.maptiler
What’s next
With MapTiler Server up and running, you can now self-host some maps. To get started and see how MapTiler Server works 👉 deploy our free sample maps.rted/).