Managing your icon sets
Icons come in icon sets where all icons are visually consistent. There are three types of icon sets:
- Catalog sets contain our default map icons. You cannot edit the sets (add, remove, or replace icons in them) but you can style the icons in any map that contains them.
- Custom sets are your own sets that you create and populate with uploaded icons.
- Migrated sets are only present if you uploaded any icons before we introduced individual icon management.
You can view all and manage custom icon sets in the icon set management section of Map Designer.
View icon sets
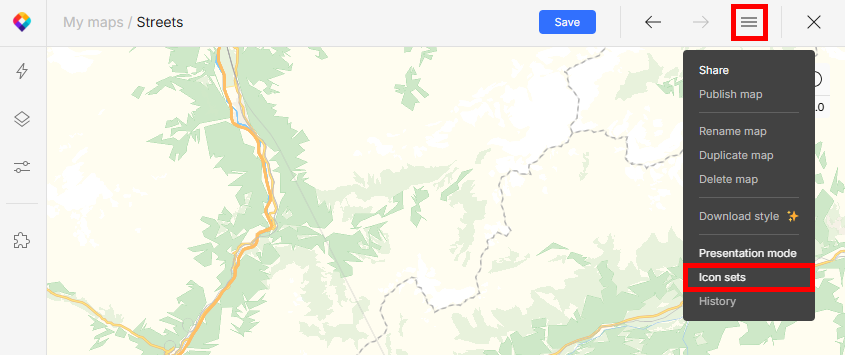
To see all icon sets across all your maps, go to the icon set management page. It’s accessible from any map:
-
Open the Map Designer. It doesn’t matter which map is in the editor.
-
Open the “hamburger” menu and click Icon sets.
Alternatively, if a map already contains icons, you can open the icon sets management directly from the Quick edits panel, section Map icons.
Warning
The icon management page is global and lists all your custom icon sets across all your maps. Editing a set here will affect every map where it is used, not just the one you’re currently working on.
Add icons
You can add icons only to a custom icon set. (Catalog icon sets aren’t editable, but you can duplicate them to create your own editable copies.)
-
On the icon management page, click the plus button to create a new (empty) icon set.
-
Click Add icons. (Alternatively, you can upload an entire sprite.)
-
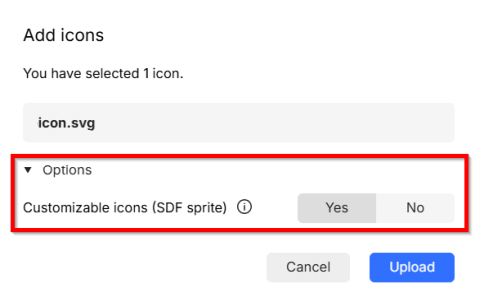
Upload individual icon files or a ZIP archive:
- Vector icons must be monochrome and will remain customizable, meaning you’ll be able to style their color, outline, opacity etc. in your maps.
For multi-color vector icons, you need to switch off the Customizable icons (SDF sprite) option in the upload dialog. This is only possible when you’re uploading icons to a new empty set. If you need to upload additional vector icons that preserve their colors, add them to a raster icon set and they’ll be converted to raster.
- Raster icons get uploaded as a double-resolution (2x) variant, meaning they’ll render in half the size in the map.
To learn more about vector vs raster format and how we process it, see 👉 how to prepare your custom icons.
Mixing icon formats
When you add the first icon to an empty set, you determine the set type: It will be either customizable (vector icons), or not customizable (raster icons). This can’t be changed later.
Adding more icons or copying icons between sets is only possible if the icons and the set are compatible:
- Raster icons to raster set ✅ possible
- Raster icons to vector set ❌ not possible
- Vector icons to vector set ✅ possible
- Vector icons to raster set ✅⚠️ possible, but the vector icon will be converted to non-customizable raster.
Swap sets
Swapping one icon set for another is a tricky action that may visually break your map. To prevent that from happening, make sure that both sets are identical in file names and total icon count.
If the map references an icon which is missing from the new set, the icon will simply vanish from the map. Because some icons only appear at specific zoom levels or locations, it may not be immediately obvious that something is wrong, and it’s not technically possible to flag the places where this might happen.
Info
We recommend to only use the swap functionality to replace an old icon set with a new set to update the design, or in similar situations where you’re sure that the new set is a complete replacement of the original.
To swap one icon set for another:
- In the Quick edits panel, scroll down to section Map icons.
- Click on the icon set to open a panel listing all other icon sets available in your account.
- Click on the new set you want to use in this map. If there’s a 1:1 match, the sets are instantly swapped.
If the sets aren’t an exact match, you’ll get a warning. It’s OK to swap sets if the new one contains all icons from the old set plus some extra icons, so we don’t prevent you from swapping sets that don’t match. Just make sure to double check what you’re doing because the action is irreversible.
Other actions
On the icon sets management page, you can also duplicate, rename, or delete your custom sets: Right-click on a set and select the desired action.
The same applies to individual icons: Right-click on a icon to rename it, replace, duplicate, delete, or copy between sets.
Renaming icons
Icon names serve as a unique identifier that ties the icons to maps where they’re used. This means that renaming icons might break your maps.
Warning
Only rename icons and sets that aren’t in use.
If you rename an icon set or an individual icon that is already used in a map, the link between the map style and the icons breaks and the icons disappear from the map. Expert users can restore the icons by updating the sprite URL in the map’s style JSON to point to the new name, but this is an advanced action and it’s better to avoid it.
Deleting icons
Deleting unused icons is theoretically safe, but there’s no technical way to verify whether an individual icon is in use or not – this is only possible for entire icon sets. For this reason, we recommend to only delete icons from sets that are not used in any map.
- On the icon sets page, click on a set and check the section Maps using this set in the right panel.
- If the icon set is in use, swap it in all maps where it’s used for an updated set.
- Proceed to delete individual icons or the whole set: right-click and select Delete.
If you need to delete an icon or a set that’s in use, keep in mind that it’s a risky action and make sure to thoroughly check your map for missing icons.