Unreal Engine with MapTiler real-world 3D content
This step-by-step tutorial will teach you how to use MapTiler maps in Unreal application. To do this, we will use the Cesium plugin for Unreal, allowing us to create digital worlds from real-world content in 3D. Now, MapTiler basemaps can be easily used in the plugin, via MapTiler or MapTiler Server for on-premise and offline use-cases.
Unreal Engine(UE) is a complete suite of game development, simulation, and other real-time application creation tools. It is built by developers for developers. Whatever your vision, bring it to life with this real-time 3D creation tool.
Installation and setting up
-
Install Unreal Engine version 5.3. Download Unreal Engine
-
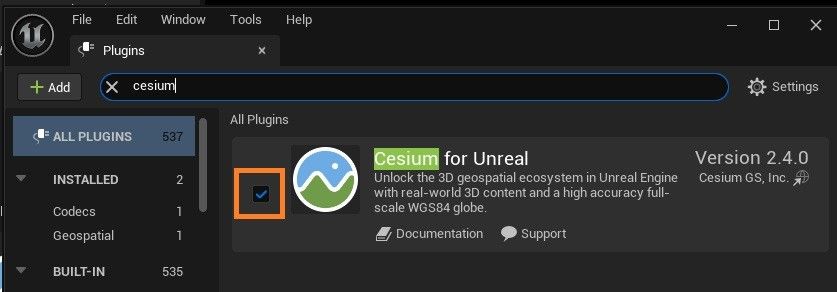
Install the Cesium for Unreal plugin. Unreal marketplace Cesium plugin
Create a new Unreal project
-
Open a new project in Unreal Engine. Launch Unreal Engine and create a new project. Select Game as the New Project Category and Blank as the Template. For a simple setup, uncheck Starter Content.
-
Turn on the Cesium plugin. Once the project is fully loaded, activate the Cesium for Unreal plugin. Open the Plugins window (Edit ➡ Plugins) and search for “Cesium” in the search bar at the top of the Plugins window. Make sure that the checkbox next to the plugin is checked. You may need to restart Unreal Engine after enabling the plugin.
-
Create a new level (File ➡ New Level). When prompted, select “Empty Level” to make sure there are no objects in the level.
-
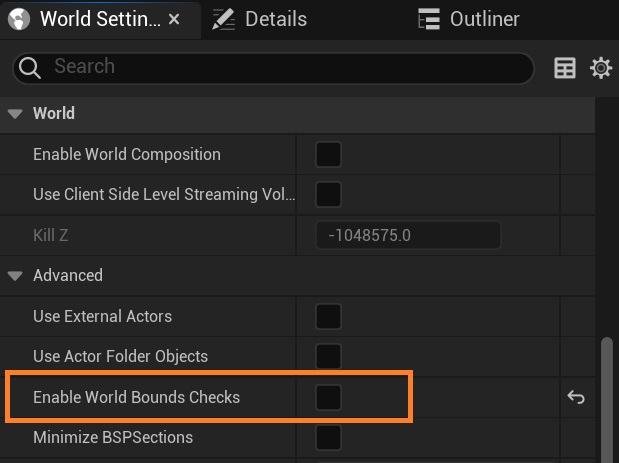
Disable the World Bounds Checks. This option is found in World Settings (Window ➡ World Settings), in the World ➡ Advanced category.
-
Open the Cesium panel by clicking Window ➡ Cesium.
-
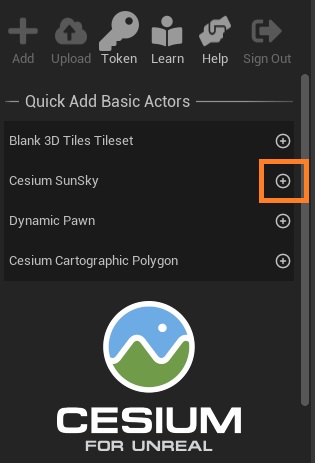
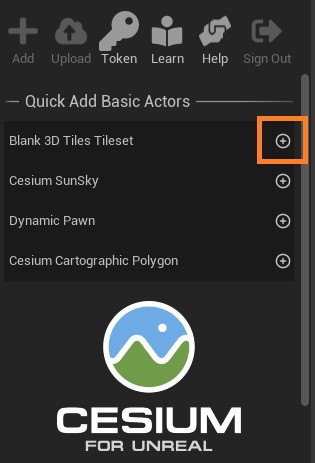
Add some lighting so you’ll be able to see the tilesets you add in later steps. Cesium for Unreal comes with a pre-made, globe-aware sun and atmosphere system called CesiumSunSky.
In the Quick Add Basic Actors section of the panel, find Cesium SunSky and click the button to add it to the level. You should see a sky-like gradient appear in the viewport.
-
Click the Save the current level to disk button in the top-left corner of the Editor, or press
Ctrl+S. Give your level a name (for example MapTilerMap). You may also want to set your new level as the project’s default map. This will make sure that your level will automatically open when you restart the project or package and run your application. In the Edit ➡ Project Settings window left sidebar, click on Maps & Modes, then look for the Default Maps section. Change both the Editor Startup Map and the Game Default Map to your new level.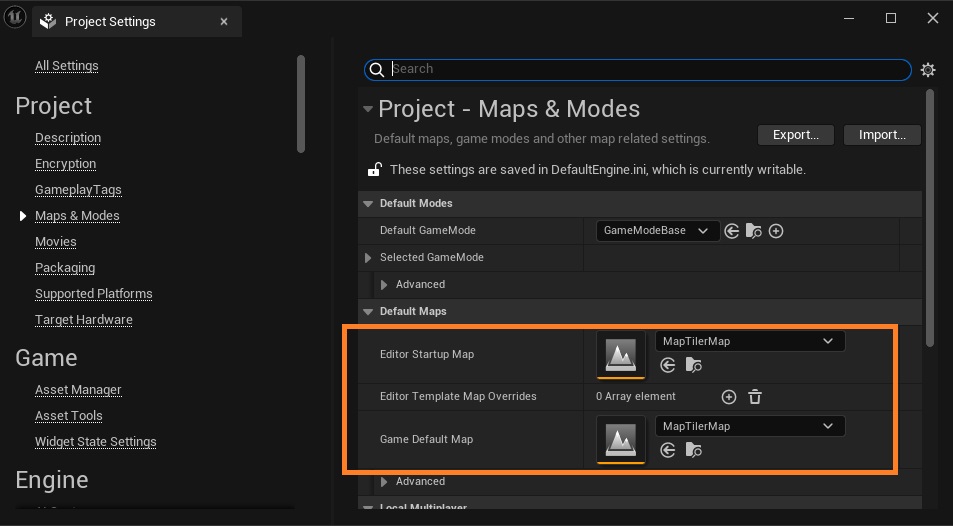
Add global real-world 3D terrain to your level
-
Add a blank 3D Tiles tileset.
-
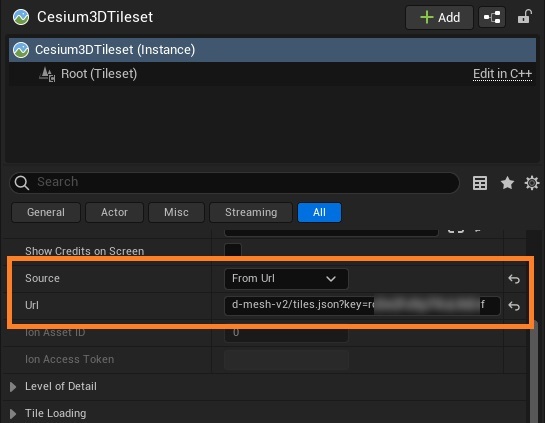
Change the source from Cesium Ion to ‘From URL’.
-
Insert the MapTiler 3D terrain tileset URL in the URL field. The tiles contain real-world elevation data encoded into vector TIN polygons in format for the Cesium JavaScript library. The URL should be
https://api.maptiler.com/tiles/terrain-quantized-mesh-v2/tiles.json?key=YOUR_MAPTILER_API_KEY_HERE(or just copy the URL from your 3D terrain in the Maptiler Cloud). ReplaceYOUR_MAPTILER_API_KEY_HEREwith your own API key. Make sure to protect the key before you publish it!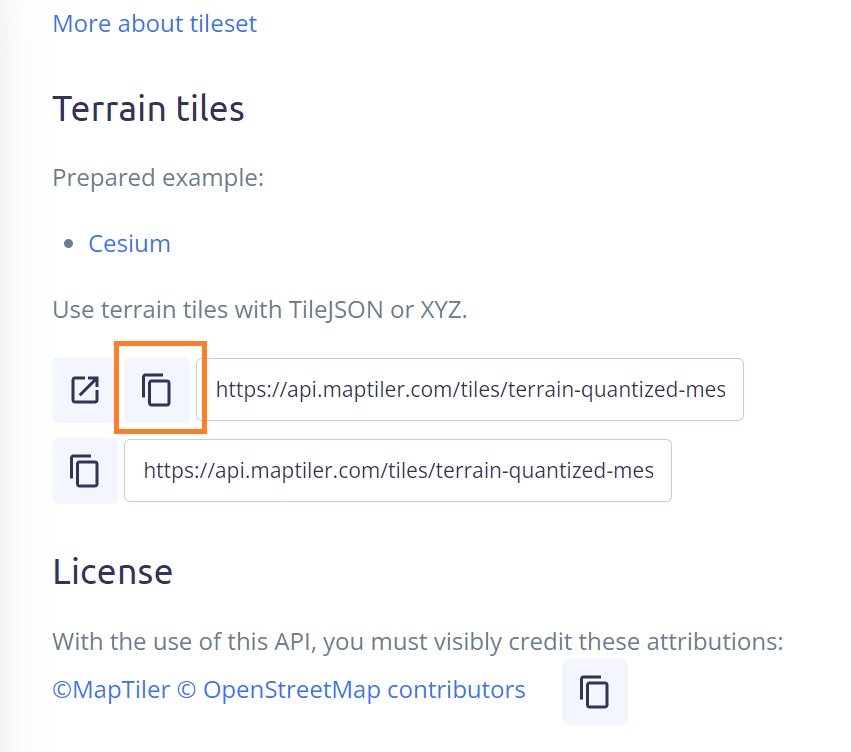
-
Add a new component in Cesium3DTileset. Add a new Web Map Tile Service Raster WMTS (
CesiumWebMapTileServiceRasterOverlay).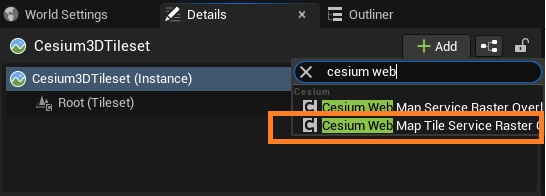
-
Get the URL of the (WMTS) Web map tile service of your MapTiler maps. Go to the MapTiler maps, and select one of the standard maps (high-quality basemaps like Planet, Ocean, High-Res Imagery) or your custom maps (Try the MapTiler Map Designer). The URL should be
https://api.maptiler.com/maps/YOUR_MAP_ID_HERE/{TileMatrix}/{TileCol}/{TileRow}.jpg?key=YOUR_MAPTILER_API_KEY_HEREor open the WMTS Capabilities.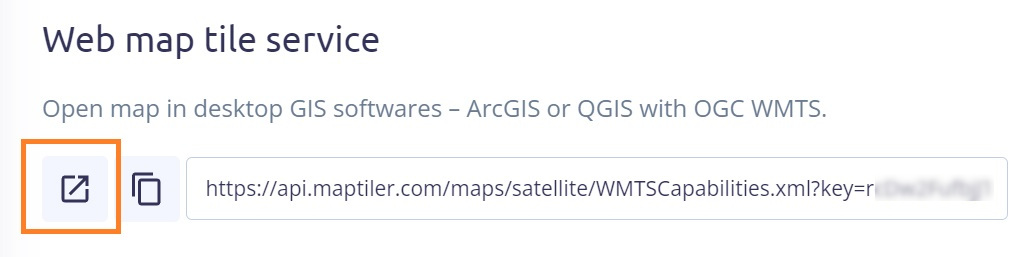
In the Capabilities XML look for the ResourceURL within Content ➡ Layer. And copy the URL value of the
templateattribute.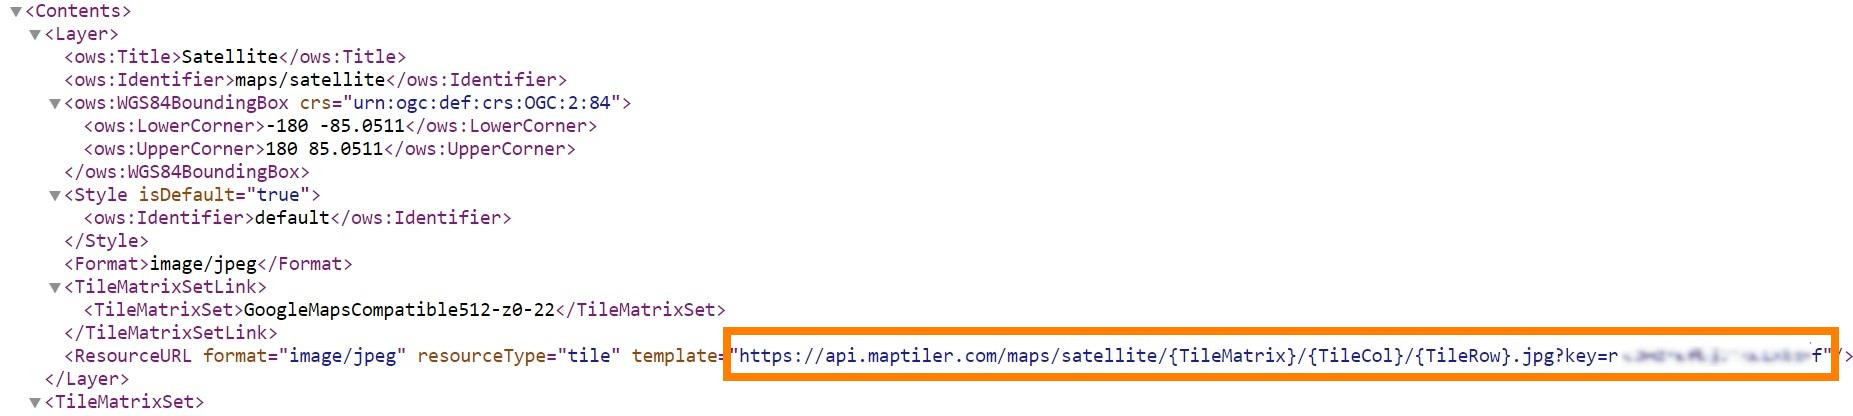
-
Configure the
CesiumWebMapTileServiceRasterOverlay. Add the WMTS URL obtained in the previous step into the URL field and check the box for ‘Use Web Mercator Projection’.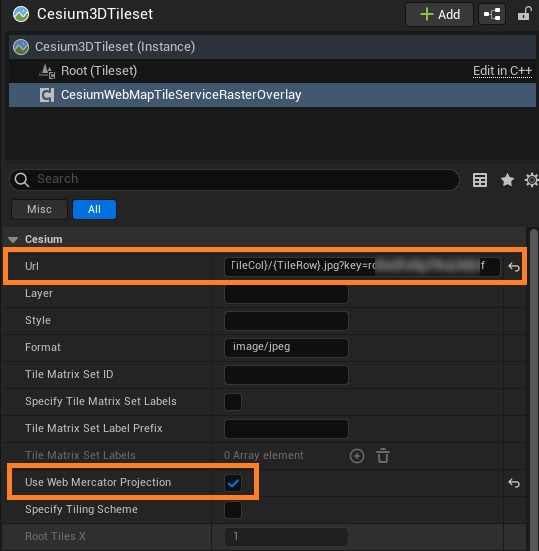
Set the initial view localization coordinates
-
Select the CesiumGeoreference actor in the Outliner. This actor determines where in the world your level is set. The level’s current latitude, longitude, and height can be changed with this actor.
-
In the Details panel, look for the Origin Latitude, Origin Longitude, and Origin Height variables under the Cesium category. Change these variables to the coordinates of your favorite city or use these coordinates to travel to Lake Louise, Canada.
 Origin Latitude = 51.395879
 Origin Longitude = -116.261587
 Origin Height = 3000.0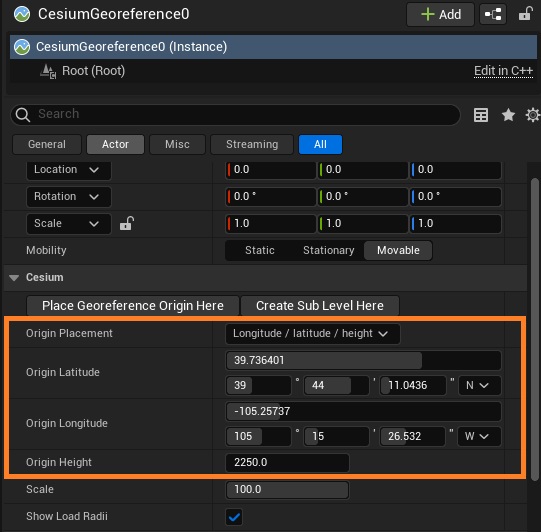
-
Press the Play button, you’ll notice that the default camera speed is very slow, and not adjustable. Given the scale that real-world data can be, you’ll need a different Pawn to efficiently navigate the level during play.
-
Add a Dynamic Pawn using the Cesium panel.

Cesium’s DynamicPawn actor extends the built-in pawn class by making it globe-aware. The DynamicPawn also adds important movement functionality, such as the ability to adjust movement speed with the mouse wheel and the ability to fly between global locations along a curved path.
Explore your level
- You’re ready to test out your level! Press the Play button at the top toolbar. Like the viewport controls, you can use the W, A, S, and D keyboard keys and the mouse to fly around. Use the mouse scroll wheel to change your speed. You’ve created your first project with Cesium for Unreal. Feel free to explore the world!
Examples
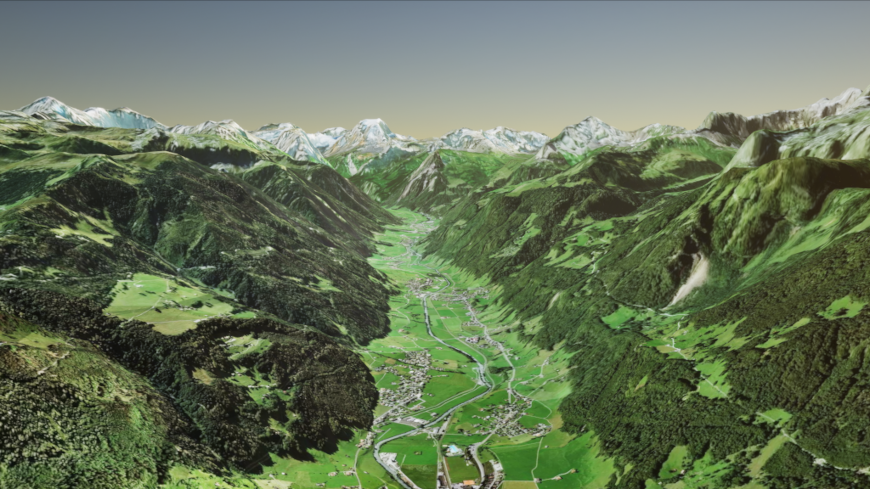 MapTiler High resolution Imagery map
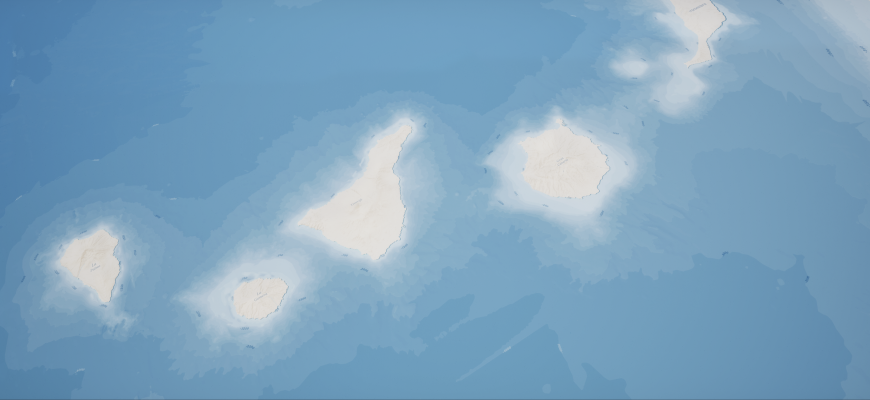 MapTiler ocean seafloor and bathymetry map
Summary
-
MapTiler basemaps can be easily used in Unreal adding a WMTS map, via MapTiler or MapTiler Server for on-premise and offline use-cases.
-
Create high-fidelity 3D geospatial visualization and simulation capabilities within the Unreal Engine environment using the MapTiler 3D terrain service.
-
Add your custom maps to Unreal. Whether they are: maps created with the MapTiler Map Designer, self-hosted maps & images for use in on-prem/local Cesium-based applications for Unreal or create your tiled service with MapTiler Engine.
Learn more
Check out the Cesium for Unreal tutorials