---
title: "Custom Annotations - Kotlin SDK | Mobile sdk | Mobile sdk android | Android"
description: "Add and interact with custom annotations in Android Kotlin."
---
# Custom Annotations - Kotlin SDK
[MapTiler SDK Kotlin](https://docs.maptiler.com/mobile-sdk/android/) is a native toolkit for building mobile maps on Android with Kotlin. It integrates with MapTiler Cloud to deliver vector tiles, styles, data overlays, and a complete mobile mapping experience.
In this guide you’ll learn how to add custom annotations to the map, display them, and interact. If you haven’t already, follow the [Getting Started](https://docs.maptiler.com/mobile-sdk/android/examples/get-started/) instructions in the Kotlin repo to set up your project and initialize the map.
There are few ways to annotate the map:
- **[MTMarker](https://docs.maptiler.com/mobile-sdk/android/api/-map-tiler-s-d-k/com.maptiler.maptilersdk.annotations/-m-t-marker/)**: colored or icon markers at a coordinate.
- **[MTTextPopup](https://docs.maptiler.com/mobile-sdk/android/api/-map-tiler-s-d-k/com.maptiler.maptilersdk.annotations/-m-t-text-popup/)**: lightweight text popups with optional offset.
- **[MTCustomAnnotationView (Compose)](https://docs.maptiler.com/mobile-sdk/android/api/-map-tiler-s-d-k/com.maptiler.maptilersdk.annotations/-m-t-custom-annotation-view/)**: custom UI composable anchored to a coordinate.
- **[MTCustomAnnotationViewClassic (XML/Views)](https://docs.maptiler.com/mobile-sdk/android/api/-map-tiler-s-d-k/com.maptiler.maptilersdk.annotations/-m-t-custom-annotation-view-classic/)**: classic View container anchored to a coordinate.
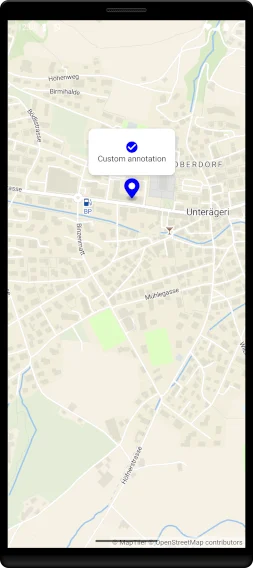 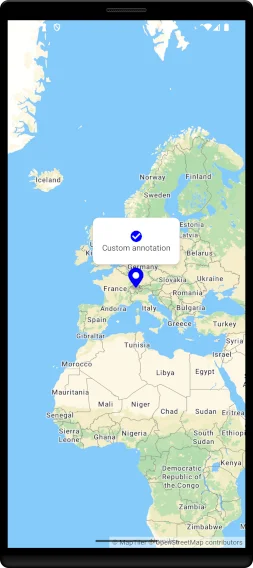
## MTCustomAnnotationView
- Compose: `MTCustomAnnotationView(controller, coordinates, offset, anchor) { ... }` renders any composable at a projected map position and automatically repositions on map movement.
- Classic Views: `MTCustomAnnotationViewClassic(context, widthPx, heightPx, coordinates, offset)` is a FrameLayout you populate with your own child Views and add to `MTMapViewClassic`. It keeps position in sync with the map.
### Compose
Put `MTMapView` and `MTCustomAnnotationView` in the same Box so the overlay positions correctly:
```kotlin
@Composable
fun MyMapWithCustomAnnotation() {
val controller = remember { MTMapViewController(context = /* your context */) }
val coord = LngLat(8.581651, 47.137765)
Box(Modifier) {
MTMapView(
referenceStyle = MTMapReferenceStyle.STREETS,
options = MTMapOptions(),
controller = controller,
modifier = Modifier.matchParentSize()
)
MTCustomAnnotationView(
controller = controller,
coordinates = coord,
offset = MTPoint(0.0, -20.0),
anchor = Alignment.BottomCenter
) {
// Your composable content…
Text("Custom annotation", color = Color.Black)
}
}
}
```
### XML Views
Inflate your layout into the custom annotation container for easier styling:
```xml
```
Add the custom annotation view to the map inside your activity:
```kotlin
fun addClassicCustomAnnotationFromXml() {
val coord = LngLat(8.581651, 47.137765)
val custom = MTCustomAnnotationViewClassic(
context = this,
widthPx = 200,
heightPx = 80,
initialCoordinates = coord,
initialOffset = MTPoint(0.0, -20.0)
)
LayoutInflater.from(this).inflate(R.layout.custom_annotation, custom, true)
custom.findViewById(R.id.close)?.setOnClickListener { custom.remove() }
custom.addTo(mapView, controller)
}
```
## Notes and Tips
- Offsets: `MTPoint(x, y)` uses pixels relative to the projected point (x right, y down). Use anchor to align content (Alignment.BottomCenter works well for callouts).
- Sizing: Classic variant requires explicit `widthPx`/`heightPx`. Compose measures content automatically.
- Lifecycle: Classic `remove()` detaches the overlay. Compose overlays clean up automatically with composable lifecycle.
## Learn more
To learn about more advanced functionalities of the SDK, refer to the [API reference](https://docs.maptiler.com/mobile-sdk/android/api/-map-tiler-s-d-k/com.maptiler.maptilersdk.annotations/).
In addition to the documentation take a look at the plug and play examples provided in the SDK GitHub repository, as well as pre-made demo app:
 [maptiler/maptiler-sdk-kotlin/Examples](https://github.com/maptiler/maptiler-sdk-kotlin/tree/main/Examples)